
What is red bean ice cream? Red bean ice cream is a delightful frozen dessert that has gained popularity in various parts of the world. It is a unique and delicious treat that combines the creamy texture of ice cream with the distinct flavor of red beans. This delectable dessert originated in East Asia, particularly in countries like Japan, China, and Korea, where red beans are commonly used in traditional desserts.
Red bean ice cream is made by infusing the flavors of cooked and sweetened red beans into a creamy base; typically, red bean ice cream is made of milk, cream, sugar, and sometimes eggs. The red beans used in this dessert are often adzuki beans, which have a slightly sweet and nutty taste. These beans are cooked until they become soft and then mashed or pureed to create a smooth consistency.
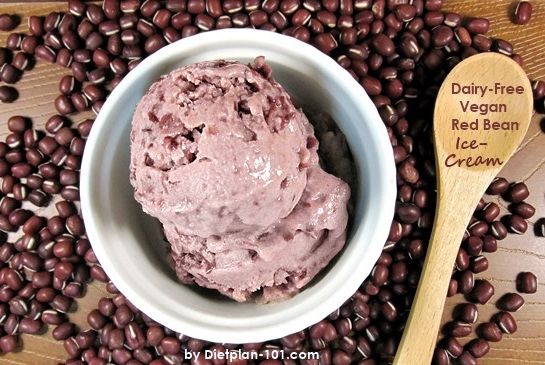
If you have yet to try this ice cream and seek a comprehensive guide, this article is there for your assistance.
Red Bean Ice Cream (Azuki Ice Cream) Recipe
Here is the comprehensive recipe for this ice cream:
Ingredients:
- 1 cup sweetened red bean paste (store-bought or homemade)
- 2 cups heavy cream
- 1 cup whole milk
- 3/4 cup granulated sugar
- 4 large egg yolks
- 1 teaspoon vanilla extract
Instructions:
- In a medium-sized saucepan, combine the heavy cream and whole milk over medium heat. Heat the mixture until it begins to steam, but avoid boiling it.
- In a separate bowl, whisk together the granulated sugar and egg yolks until well combined.
- Slowly pour about half of the hot cream mixture into the egg yolk mixture while continuously whisking. This step is called tempering and helps prevent the eggs from curdling.
- Pour the tempered egg yolk mixture back into the saucepan with the remaining hot cream mixture. Cook over low heat, stirring constantly with a wooden spoon or spatula, until the mixture thickens slightly and coats the back of the spoon. This should take about 5-7 minutes.
- Remove the saucepan from heat and stir in the vanilla extract. Allow the mixture to cool to room temperature.
- Once cooled, cover the saucepan with plastic wrap, ensuring that it touches the surface of the custard to prevent skin from forming. Refrigerate for at least 4 hours or overnight to chill completely.
- After chilling, transfer the custard mixture to an ice cream maker and churn according to the manufacturer’s instructions. This usually takes about 20-30 minutes.
- While the ice cream is churning, prepare the sweetened red bean paste. If using store-bought red bean paste, measure out 1 cup. If making it from scratch, you can find various recipes online or in cookbooks dedicated to Asian desserts.
- Once the ice cream reaches a soft-serve consistency, add the sweetened red bean paste to the machine and continue churning for another 5 minutes or until well incorporated.
- Transfer the red bean ice cream to an airtight container and freeze for at least 4 hours or until firm.
- When ready to serve, allow the ice cream to soften at room temperature for a few minutes before scooping it into bowls or cones.
How To Make Red Bean Ice Cream?
To make red bean ice cream, follow these step-by-step instructions:
Step 1: Soaking the Red Beans
- Start by soaking 1 cup of dried red beans in water overnight. This will help soften the beans and reduce the cooking time.
Step 2: Cooking the Red Beans
- Drain the soaked red beans and transfer them to a pot. Add enough water to cover the beans and bring it to a boil.
- Reduce the heat to low and let the beans simmer for about 1 hour or until tender. Make sure to stir occasionally and add more water if needed.
- Once cooked, drain the beans and set them aside to cool.
Step 3: Preparing the Red Bean Paste
- Take half of the cooked red beans and blend them in a food processor or blender until smooth. This will create a creamy red bean paste.
- In a separate saucepan, combine the red bean paste with 1/2 cup of sugar and 1/2 cup of water. Cook over medium heat, stirring constantly, until the mixture thickens slightly. Remove from heat and let it cool.
Step 4: Making the Ice Cream Base
- In a mixing bowl, whisk together 2 cups of heavy cream, 1 cup of whole milk, and 3/4 cup of sugar until the sugar is fully dissolved.
- Add 1 teaspoon of vanilla extract to enhance the flavor of the ice cream base.
Step 5: Combining the Red Bean Paste and Ice Cream Base
- Pour the cooled red bean paste into the ice cream base mixture. Stir well to ensure that it is evenly incorporated.
Step 6: Chilling the Mixture
- Cover the bowl with plastic wrap or transfer it to an airtight container. Place it in the refrigerator for at least 4 hours or overnight to chill thoroughly.
Step 7: Churning the Ice Cream
- Once the mixture is chilled, pour it into an ice cream maker and churn according to the manufacturer’s instructions. This usually takes about 20-30 minutes.
- Add the remaining cooked red beans to the ice cream mixture during the last few minutes of churning. This will provide texture and additional bursts of red bean flavor.
Step 8: Freezing the Ice Cream
- Transfer the churned ice cream into a lidded container and freeze for at least 4 hours or until firm.
- If you prefer a softer consistency, you can enjoy the ice cream immediately after churning it without freezing it further.
Step 9: Serving
- Scoop the red bean ice cream into bowls or cones and garnish with additional red beans if desired.
- You can also serve it with some sweetened condensed milk drizzled on top for added sweetness.
How To Store Homemade Ice Cream?
Storing homemade ice cream properly is essential to maintain its texture, flavor, and quality. Improper storage can lead to the formation of ice crystals, loss of creaminess, and a decline in taste.
To ensure that your homemade ice cream stays fresh and delicious, follow these guidelines:
Cooling and Freezing
After churning the ice cream mixture in an ice cream maker, it is important to cool it down before transferring it to the freezer. Allow the freshly churned ice cream to sit in the refrigerator for about 2 hours to cool completely. This step helps stabilize the mixture and prevents large ice crystals from forming during freezing.
Container Selection
Choosing the right container for storing homemade ice cream is crucial. Opt for a container that is freezer-safe, airtight, and non-reactive. Plastic or stainless steel containers with tight-fitting lids work well. Avoid using containers made of glass or aluminum, as they can affect the taste and texture of the ice cream.
Filling and Leveling
When transferring the cooled ice cream into the storage container, leave only a little headspace. Leaving excess air in the container can lead to freezer burn and crystallization. Fill the container almost to the top, leaving only a small gap to allow for expansion during freezing.
Covering and Sealing
Once filled, cover the surface of the ice cream with a layer of plastic wrap or parchment paper before sealing the container with its lid. This extra layer helps prevent ice crystals from forming on top of the ice cream.
Airtight Seal
Ensure the container is tightly sealed to prevent air from entering and causing freezer burn. If using a container with a loose-fitting lid, consider placing a layer of plastic wrap directly on top of the ice cream before closing it with the cover.
Storage Temperature
Homemade ice cream should be stored at a temperature of -18°C (0°F) or lower. Set your freezer to the coldest setting to maintain the ideal storage temperature. Fluctuations in temperature can lead to the formation of ice crystals and affect the overall quality of the ice cream.
Avoid Frequent Thawing and Refreezing
Repeatedly thawing and refreezing homemade ice cream can cause it to become icy and lose its smooth texture. When removing ice cream from the freezer, take out only the amount you plan to serve and promptly return the rest to the freezer.
Proper Handling
When scooping ice cream from the container, use a clean, dry scoop or spoon to prevent contamination. Avoid using utensils made of metal, as they can conduct heat and cause premature melting.
Labeling and Dating
To keep track of freshness, label the container with the date it was made and stored. Homemade ice cream is best consumed within 1-2 months for optimal taste and texture.
Thawing Before Serving
Before serving homemade ice cream, allow it to thaw in the refrigerator for 10-15 minutes. This short thawing period helps soften the ice cream slightly, making it easier to scoop.
Red Bean No-Churn Ice Cream
Red bean no-churn ice cream is a delicious and creamy frozen treat that combines the rich flavors of red beans with the smoothness of ice cream. This recipe does not require an ice cream maker, making it easy and accessible for anyone to make at home. In this detailed guide, we will walk you through the step-by-step process of making red bean no-churn ice cream.
Ingredients
- 1 cup cooked red beans
- 1 cup heavy cream
- 1 can (14 oz) sweetened condensed milk
- 1 teaspoon vanilla extract
Instructions
- Start by cooking the red beans if you haven’t done so already. You can use canned red beans or cook them from scratch. If using canned beans, rinse them thoroughly under cold water to remove any excess salt or preservatives.
- In a blender or food processor, puree the cooked red beans until smooth. Set aside.
- In a large mixing bowl, whip the heavy cream until stiff peaks form. This can be done using an electric mixer or by hand with a whisk.
- Gently fold in the sweetened condensed milk and vanilla extract into the whipped cream until well combined.
- Add the pureed red beans to the mixture and gently fold them in until evenly distributed.
- Pour the mixture into a loaf pan or a freezer-safe container of your choice. Smooth out the top with a spatula.
- Cover the pan tightly with plastic wrap or aluminum foil to prevent ice crystals from forming on the surface.
- Place the pan in the freezer and let it freeze for at least 6 hours or overnight until firm.
- Once fully frozen, your red bean no-churn ice cream is ready to be enjoyed! Serve it in bowls or cones and garnish with additional red beans if desired.
Conclusion
In conclusion, red bean ice cream is a delightful and unique dessert that has gained popularity in various parts of the world. Its rich and creamy texture, combined with the subtle sweetness of red beans, creates a harmonious flavor profile that appeals to many taste buds. This frozen treat satisfies cravings and offers potential health benefits, as red beans are known for their nutritional value.
Whether enjoyed on its own or as a topping for other desserts, red bean ice cream is a delicious and refreshing option for those seeking something different. Why not give it a try and indulge in this delightful frozen treat?
Frequently Asked Questions (FAQ’s)
What Flavor Is Red Bean Ice Cream?
Red bean ice cream has a unique and distinct flavor that can be described as sweet, nutty, and slightly earthy. It is made by blending or pureeing cooked red beans with cream, sugar, and sometimes additional flavors like vanilla or coconut.
What Does Red Bean Flavor Taste Like?
The red bean flavor is often described as sweet, nutty, and slightly earthy, with a hint of bitterness. It has a unique taste that is distinct from other types of beans.
Is Red Bean Ice Cream Good For You?
Red bean ice cream can be a part of a balanced diet when consumed in moderation, as it provides some nutritional benefits such as fiber and protein.
Where Is Red Bean Ice Cream From?
Red bean ice cream is believed to have originated in Japan, where it is a popular traditional dessert. It is made by combining red bean paste with milk or cream and freezing it.


