Blenders are a great kitchen appliance that make it easy to whip up smoothies, soups, sauces, and more. However, with regular use, blenders can quickly become dirty and difficult to clean. If you want to keep your blender in top condition, it’s important to know how to clean it properly.
In this article, we’ll provide you with a complete guide on how to wash your blender and keep it looking and performing like new. From the blades to the pitcher, we’ll cover all the steps you need to take to ensure that your blender is clean and hygienic, and ready for your next culinary creation.
Why Is It Important To Wash The Blender Thoroughly?
Cleaning your blender thoroughly is essential for several reasons. Here are a few key reasons why it’s important to wash your blender regularly and thoroughly:
Hygiene
The blender is a food preparation tool that comes into contact with raw ingredients, such as fruits, vegetables, and herbs, that may contain harmful bacteria, pesticides, or other contaminants. If these contaminants are not properly removed, they can accumulate in the blender and potentially contaminate future batches of food. This can be especially dangerous for people with weakened immune systems or food sensitivities.
Performance
A dirty blender can also affect the performance of the machine. If food debris or residue is left on the blades or in the pitcher, it can interfere with the blender’s ability to blend smoothly and evenly. This can result in lumpy, uneven textures or even damage to the blender’s motor or blades over time.
Taste
A dirty blender can also affect the taste of your food. Lingering flavors and odours from previous meals can transfer to new recipes, resulting in off-tasting smoothies, soups, or sauces.
Longevity
Lastly, regular cleaning and maintenance can help extend the lifespan of your blender. A well-maintained blender will perform better and last longer than one that is neglected or improperly cleaned.
In summary, it’s important to wash your blender thoroughly to maintain good hygiene, ensure optimal performance, achieve good taste, and extend its lifespan. By following proper cleaning procedures and taking care of your blender, you can ensure that it continues to serve you well for years to come.
How To Wash Blender – Stepwise
Washing a blender might seem like a simple task, but there are a few steps you should follow to ensure that you clean it properly and effectively. Here’s a step-by-step guide on how to wash your blender:

Step 1: Disassemble the blender
Before you start washing your blender, you should first disassemble it. Remove the blender pitcher, including the blades, and any other detachable parts. This will make it easier to clean each part thoroughly.
Step 2: Rinse the blender
Rinse the blender pitcher and blades under running water to remove any loose debris or food particles. This will make it easier to clean the blender effectively.
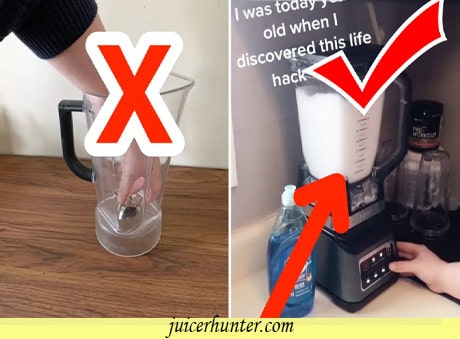
Step 3: Fill the blender with warm water and dish soap
Fill the blender pitcher with warm water and add a few drops of dish soap. You can also add a small amount of white vinegar to help disinfect the blender.
Step 4: Blend the soapy water
Replace the blender pitcher on the blender base and turn the blender on for a few seconds to blend the soapy water. This will help to loosen any remaining debris or food particles that may be stuck on the blades or inside the pitcher.
Step 5: Scrub the blender
Using a soft sponge or brush, scrub the blender thoroughly, paying special attention to the blades and areas where food debris may have accumulated. Be sure to scrub the outside of the pitcher as well.
Step 6: Rinse the blender
Once you have thoroughly scrubbed the blender, rinse it under running water to remove any soap or vinegar residue. Be sure to rinse the blades and all other detachable parts thoroughly.
Step 7: Dry the blender
Once you have finished rinsing the blender, shake off any excess water and use a clean towel to dry the blender thoroughly. Be sure to dry all the detachable parts as well.
Step 8: Reassemble the blender
Once the blender and all detachable parts are completely dry, reassemble the blender by attaching the blades and other parts as needed. Your blender is now ready to use again!
In summary, washing a blender is a simple process that involves disassembling the blender, rinsing it, filling it with soapy water, blending the water, scrubbing the blender, rinsing it again, and drying it completely before reassembling it. By following these steps and taking care of your blender, you can ensure that it remains clean, hygienic, and in good condition for years to come.

Alternate ways to wash the blender
While the standard method of washing a blender involves using warm water and dish soap, there are several alternative methods that you can use to clean your blender. Here are a few different methods you can try:
Using A Dishwasher
Many blender pitchers and blades are dishwasher safe, which means you can simply place them in the dishwasher and run a cycle. This is a convenient and easy way to clean the blender, although you should still rinse the pitcher and blades before placing them in the dishwasher to remove any loose debris or food particles.
Using Baking Soda
Baking soda is a natural cleaning agent that can help to remove tough stains and odours from the blender. Simply mix equal parts baking soda and water to create a paste, and apply the paste to the blender pitcher and blades. Scrub the blender thoroughly with a soft sponge or brush and rinse with warm water.
Using Lemon Juice
Lemon juice is another natural cleaning agent that can help to remove stains and odours from the blender. Simply fill the blender pitcher with warm water and add a few tablespoons of lemon juice. Turn the blender on for a few seconds to blend the lemon juice, and then let the mixture sit for a few minutes. Rinse the blender thoroughly with warm water.
Using Vinegar
Vinegar is another natural cleaning agent that can help to disinfect the blender and remove stains and odours. Fill the blender pitcher with equal parts water and white vinegar, and let it sit for a few minutes. Then, turn the blender on for a few seconds to blend the vinegar mixture. Rinse the blender thoroughly with warm water.
Hence, there are several different methods you can use to clean your blender, ranging from using a dishwasher to natural cleaning agents such as baking soda, lemon juice, and vinegar. Whichever method you choose, be sure to rinse the blender thoroughly and dry it completely before using it again. By taking care of your blender and cleaning it regularly, you can ensure that it remains clean, hygienic, and in good condition for years to come.

Final Thoughts
In conclusion, washing a blender is a simple but important task that should be done regularly to maintain hygiene and optimize performance. By following the step-by-step guide outlined in this article, you can effectively clean your blender and keep it in top condition.
Additionally, there are alternative methods such as using a dishwasher or natural cleaning agents like baking soda, lemon juice, and vinegar that you can use to clean your blender. Whichever method you choose, be sure to rinse the blender thoroughly and dry it completely before reassembling it. Taking care of your blender and cleaning it regularly will extend its lifespan and help ensure that it continues to perform well for years to come.


